Tuesday, June 28, 2011

Bookmark for my daugher


My 12 year old had asked me to make her a bookmark. She said that she wanted zebra stripes on it. I made this using some white card stock that was cut down to 2" x 6 1/2". The zebra stripes come from the Make the Cut gallery called zebra stripes. I deleted some and changed the sizing of it to fit what I needed. I did have to cut off some of the ends though. Her name is spelled using bold Curlz MT font. The ribbon is some that was in my stash. Hope you enjoy and I'm sure I'll be making more of these. I have a feeling that she'll want me to make one for each of her best friends!! :) Have a great day!!


Hugs,


Stephanie

End of Year Teacher Gifts


Hi friends!! Here is a teacher gift that I made for my kids to give to their teachers. I know it seems like it is late but they go to school all year round so their last day of school isn't until this Thursday. I saw this idea on the old Cricut Messageboard. It is so easy and simple to make. All you have to do is buy some acrylic picture frames. I found a few at the Dollar Tree. Scrap a 5 x 7 piece of paper and slide it into the frame. The paper is from the Grade School stack from DCWV. The zig zag is cut from the Plantin Schoolbook cartridge at 1 1/2". I did have to trim it down some as it was bigger than what I needed. The green card stock is golf course from coredinations. The apple and bus is from the Doodlecharms cartridge. I cut them at 2". The bottom part is a 2" x 5" strip of paper. I added the letters using the Roly Poly feature of the Plantin Schoolbook cartridge. They were cut at 1 1/2". I added some faux stitching and then glued it to the outside of the bottom. I did that because the stickers didn't want to come completely off. I tried just about everything to get all the sticky stuff off. Just slap some post it notes onto the top of the frame and there you go!! I'd love to hear what you've done for teachers! Have a great day!!

Hugs,

Stephanie


Monday, June 27, 2011

Birthday Arrangement


Hi friends!! I am in the midst of making things for my daughter's birthday party which is this weekend!! I was going to make a gumball topiary but decided against it. I decided to put my Cricut to work instead. I took a dollar pail from Target and covered it with some card stock to hide the polka dot pattern that didn't match the party colors. To hide some imperfections, I added the ribbon to the top part of the pail. The pinwheels are from an earlier post. They are simple to make. I added them at the end because I felt that it was just missing something. All of the cuts are from the Sweet Treats cartridge. The ice cream cone is cut at 4 1/2". Happy Birthday, the party hat and the 5 candle is 4". I attached them to bbq skewers and then poked them down into the Styrofoam. I added some sparkly shredded paper to cover the Styrofoam and there you have it. Simple and easy! I'd love to hear what all you've done for birthday party decor!!


Hugs,


Stephanie

Pin the Cherry on the Ice Cream Cone


Hi friends!! I have been working on my daughter's 5th birthday party! I am almost done with everything. Today I have a twist to the game Pin the Tail on the Donkey. We are having an ice cream party for her and so we will play pin the cherry on top of the ice cream cone. I took a poster board that I bought at the Dollar store. I used Plantin Schoolbook for the lettering. The letters are 2 1/2" and I believe that they are cut using the roly poly feature as well. The ice cream cone is cut using fit to page. I had some trouble with a couple of the layers so they were cut using the sizing of 11 1/2". It is from the Sweet Treats cartridge. I added some stickling to the cherries to make them stand out. I cut out 2" circles for the cherries. I hope that this will be a sweet addition to my daughter's party!! :)

Wednesday, June 22, 2011

Pinwheels


These are the cutest and easiest things to make for any kind of decoration!! I am making these for some added decoration for my youngest daughter's birthday party. All I did was take two 6" squares of two different kinds of paper. (You can either cut them down yourself or use the Cricut and cut a 6" square. I found it easier to cut the 12 x 12 scrapbook paper down myself. The solid card stock paper was easier to cut through my Cricut using George cartridge.) If you use double sided paper, then you only need one sheet. I used papers that coordinated with the invitations that I made. I made diagonal lines on one sheet. The lines met in the center of the paper. From the center, I measured out 1" on each line and made a mark. I then cut along the lines until I reached the mark. You leave one inch from the center uncut. Take and using alternating slits, I folded down to the center of the pinwheel. Once all alternating ends are brought to the center, I took a thumb tack and pushed it through the center. I added a pencil to the back so that it had a stick and the eraser helped the pinwheel to stay together. Here is the link that I found the idea and how to make it from.


The possibilities with the different types of papers are endless. I alternated the two kinds of solid card stock. I'm thinking I need to make some for the 4th of July!!


Have a great afternoon!!


Hugs,


Stephanie

Friday, June 17, 2011

Father's Day gift


Hi friends!! Today I have a gift that my daycare kids helped put together for their Dad for Father's Day. I cut out the frame using my Cricut. I used Design Studio and the Keystone cartridge to weld together the letters. I used recycled cereal boxes for the frame. I cut out all the letters separately too. The children glued the letters down to the frame. They wrote on their tag and stars and then glued them down. No one wanted to try tying the ribbon so I did do that. I have also taped down some pictures inside the two D's of each of the children. I added some bent paperclips and taped them to the back to allow for it to stand up. I hope all the father's really like them! Have a great weekend!!


Hugs,


Stephanie

Tuesday, June 14, 2011

Thank You Card

My son has been struggling in school this year. He passed his EOG tests and I was so proud of him!! One of his teacher's had bought him a Wendy's gift card for all the hard work he did on the tests! I made her a thank you card for him to write in and give to her. The cards are a precut card and envelope set that my mom who happens to support my habit from time to time picked up for me. All I had to do was fold the card in half. I cut a piece of the dotted paper from DCWV called Dot Colored Lines. I picked this up at Jo Ann's when they were having a great sale on their open stock paper. The pink is lipstick from coredinations. I used an SVG cut that I'm not sure where exactly I picked it up from. I'm thinking SVGcuts.com. I added some gems and a blue ribbon and there it was! It was so simple and easy to make once I decided what exactly I wanted to do. It took more time picking out the image than putting the card together. I have some more birthday party stuff to work on so be looking back for all that!!
Hugs,
Stephanie

Monday, June 13, 2011

Birthday Party Invitations using Sweet Treats


Hi friends!! I decided to make my daughter's invitations to her fifth birthday party. I came across some really cute ice cream plates, cups, and napkins at Party City so decided to go with an ice cream party! I am so excited to do this!!! We plan on making some homemade ice cream in my ice cream maker and allowing the kids to make their own ice cream in a baggie. I bought this really cute dotted paper that matches the colors in the plates and cups. I wanted the front to say "I scream, you scream, we all scream for ice cream!" so I decided to create on my computer a sheet that said nothing but that. I decided to print it onto the dotted paper. The dotted paper is from JoAnn's. It is made by DCWV and is called Dot Colored Lines. I cut it down to allow a border around the card. The card is made from some pastel card stock that I bought from Wal-Mart years ago. It was 8 1/2 x 11" and I just cut it in two to make a standard A2 card. I glued down the dotted paper after printing on it. I then took the Sweet Treats cartridge and cut out the ice cream cone and its layers. The striped green paper is from Colorblok and called Spring Green Plaid. The pink card stock is lipstick from Coredinations. The brown and tan card stock is from coredinations and is called opal and java bean. I believe that the ice cream cone is cut at about 4 1/2 inches. I embossed the cone with the argyle embossing folder to make it look more similar to a cone and add texture. I wanted something different for the cherry and so I glued down a red button. I love it and thought it turned out great!! For the inside, I printed from my computer the actual details of the party. When I was done with that, I added a sundae that I cut from sweet treats. I didn't write down the size of this but it is about 2 to 2 1/2". I used the same paper as from the front. I also added stickles to the cherry to give it some sparkle. Voila!! Easy and simple invitations!

Hugs,

Stephanie

Saturday, June 11, 2011

Baseball Treat Bag


My son plays for the Pirates baseball team in our town. I made these treat bags for all the boys on his team. I thought I'd give them out the night of their end of season swimming party. I used Plantin Schoolbook to make the bag. I used the Tall Ball and Fit to Page features of the cricut. I chose to make the bags black as this is one of their team colors. I added a baseball that I cut from the Baseball cartridge to put on the fronts of the bags. It is cut at 5 1/4". I first cut the white background of the ball using the blackout feature. Using red card stock, I cut out the lacing. The "P" comes from a free svg file that I got by googling Pittsburgh Pirates svg files. I deleted everything except for the P. I wanted only the P because that is what is on their hats. I cut a layer on gold paper and a layer on red because that is how their lettering goes in the MLB. The black charm is cut using Plantin Schoolbook as well. I used tag 1 and the Italic features. It is cut at 5". I trimmed the bottom down to 3 1/4" because it was to long. I glued them all together and tied a black ribbon attaching the tag to the bag. Now, I just need to fill them with some baseball goodies and their done!


Do you do anything crafty for your child's sports team? I'd love to hear about it!

Hugs,

Stephanie

Thursday, June 9, 2011

Baby Mini-Album

I made this mini album for one of my daycare parents for her baby shower. They are having a boy and is going to name him Jacob. It was made mostly by reusing scraps and cereal boxes. The pages I cut out from recycled cereal boxes. I used George to cut a 7 inch square. I then glued scrapbook paper to each side to create the pages. The nursery's theme is monkeys. I wanted a monkey on the front. New Arrival had a really cute monkey and so I enlarged it to about 6 inches. The font comes from Plantin Schoolbook. It is cut at about 1 1/2 inches.


This page was made for the hospital pictures. I wanted something that would give the date, time, weight, and length. The New Arrival cartridge had an annoucement feature that I used. It was cut at about 6 inches. I added some ribbon on the page for the picture.


I loved this star paper and didn't have enough of it to put it on both sides of these two pages. I put it on the left side and decided to do plain white card stock on the other side. The title is cut using Make The Cut software and welding the letters together. The font is Script MT bold. The moon comes from the New Arrival cartridge. The star was placed in between the pages to add more photos or just for journaling.


This star was cut using the George cartridge. I first cut it from the cereal boxes and then added the paper on top. This gives it the added sturdiness for looking through the album. I inked the sides of the star and added some stamping and a button.


I loved this baby bottle paper. I didn't have much of it but had this size. I decided that it would be a great mat and pop against the white card stock. The BABY blocks were cut using the New Arrival cartridge. I pop dotted them to add dimension. They were cut at about 3".


I decided to do a page where the parents could put pictures of the baby through the first year. I added an envelope which was cut using the fit to page feature. The envelope comes from Plantin Schoolbook. I folded the flap inside the envelope so that the tags would stick out. I added a brad that says "Little Cutie." The tags were cut at about 6".


I saw this ruler at Michaels this last weekend when I was there. I thought it would be a perfect addition to this album. I decided to do a giraffe beside it since giraffes are tall. The giraffe is from the New Arrival cartridge. It is cut at about 6". First I cut on the brown card stock and then the polka dot yellow paper. I chalked the edges for an added touch. The title to the page was created using Make The Cut software and welding together the letters using Script MT Bold.


These are the tags that I made to put in the envelope. I wanted them to be used for adding pictures throughout the first year. I have the hand and footprints for the newborn pictures. The baby is due in July so I added a few pages for holiday pictures. One for fall or Halloween, Christmas, winter and then the first birthday. I added some embellishments at the bottom. The hands and footprints have footprints from the New Arrival cartridge. They were cut at about 2 inches. The fall tag has a pumpkin. The pumpkin comes from the Doodlecharms cartridge. The Santa Face tag has a reindeer cut from Doodlecharms as well. The nose is stickled with red for a Rudolph look. The winter tag has snowflakes from the Doodlecharms cartridge too. I stickled them as well. It was really hard to not do any sparkles. I was able to incorporate it without it getting to be to girly! :-) I added ribbon to the tops and stapled them to the tag.


You can't tell very much but this is an alphabet background with pale yellow stripes. I have had this paper for many years. This was one of the first paper packs that I bought when I first started scrap booking. I bought this from Ollie's. It came with some frames and stickers which I hardly have used since getting my Cricut. I prefer to use my Cricut to cut just about everything. I liked the green polka dot paper. I think it pops against the yellow. I then just took some white ribbon and added buttons to the ends. The heart is from the George cartridge. I cut it out first from some cereal boxes and then added the paper on top.


This is one of my favorite pages. I think because we are in the height of baseball season. The font is from Plantin Schoolbook. I used the roly poly feature. I liked mixing the capital letters with the lowercase letters. The stars come from the George cartridge. They are white card stock with yellow edges inked. The red mats are just scraps cut at random to fit on the page.


I love the cute choo choo on this patterned paper from DCWV. The baby's room is decorated in monkeys so this makes it more cuter and appropriate to put in the album. The monkey at the top of the page is cut from New Arrival. I then glued it onto a tiny wooden clothespin. It was cut about 2".


This choo choo train came from the New Arrival cartridge. I love this cartridge! It is one of my go to's. I think that the train was cut at about 2 or 3". I used my scraps to cut this.


This was the back of the album. I have been trying to make sure that I sign my projects. This was what I came up with as I ran out of ink in my printer and couldn't print anything out.


Let me know what you think and if you've made any mini albums. I'd love to see them! Post a link in the comments and I'll take a look!!


Hugs,


Stephanie

H A P P Y B I R T H D A Y Banner


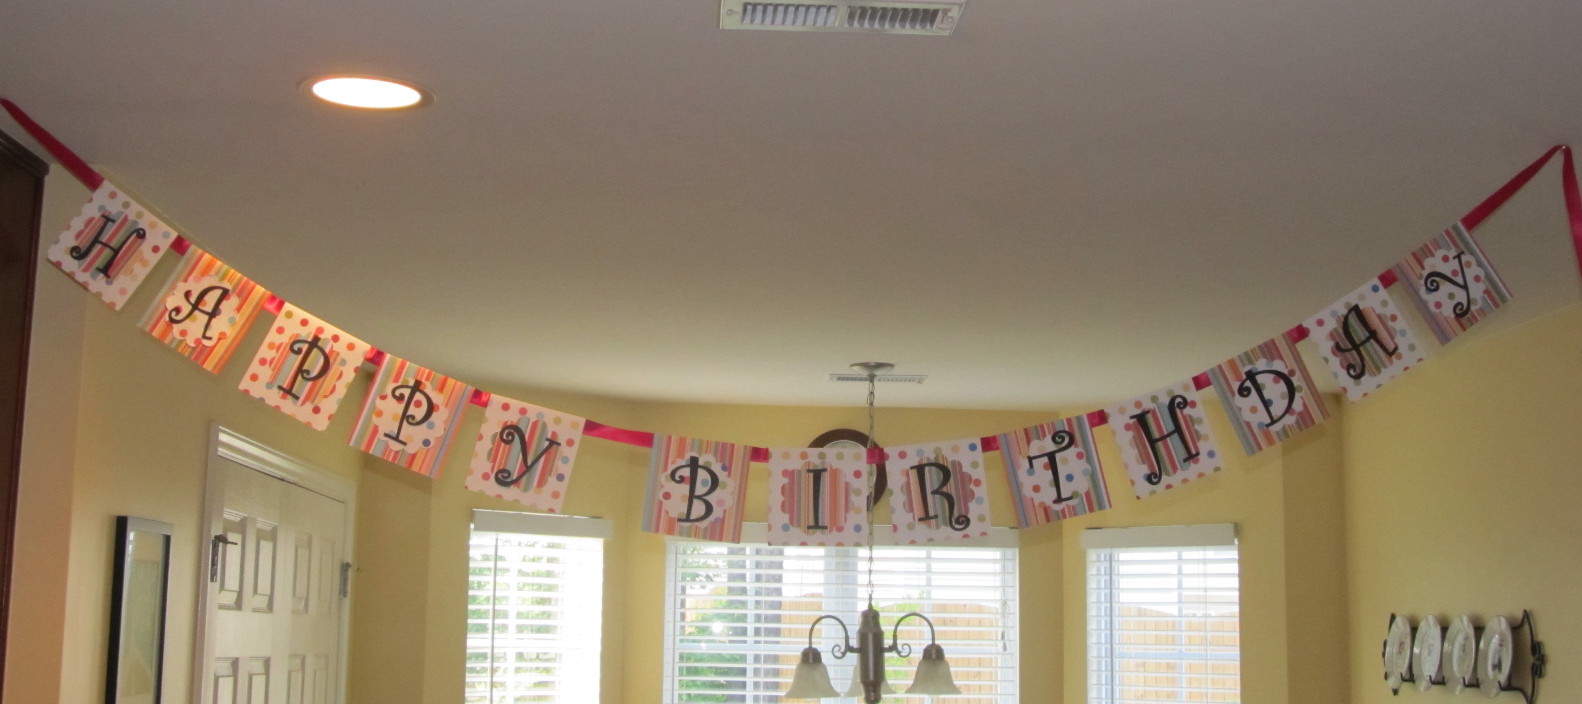
A friend of mine had asked me to create her daughter's first birthday invitations. I posted them a little while back. I offered to make her a birthday banner to go match the party decor. I used the same papers from the invitations. It was really long but was adorable!!! The paper came from JoAnn's. I alternated a striped paper and a dotted paper as the background. I cut a rectangle that was 5" x 10". I then folded them in half and glued ribbon to the top of the inside of the square. I then cut a scalloped circle out of the opposite paper. If the background was striped, the scalloped circle was the dotted paper. I then used Make The Cut software to cut the lettering. The letters are different sizes. I just eyeballed it. The font used was Curlz MT. I used black card stock for the lettering. I wanted it to pop and felt that black was the best color.


OK Friends - I am so EMBARRASSED!!!!! I just clicked on the picture of the banner to bring up a close up of it. I screwed it up!!! The I and the R's background and scalloped circle is the same instead of alternating!!!!!! I can't believe that I didn't catch it or that I didn't even notice it until now. The party was almost 2 weeks ago!!


If you've made a birthday banner, send me a link. I'd like to see how you do them. I'm working on one for my daughter's birthday. I'm going to do a triangular shaped banner. Hopefully, I won't screw this one up too!! I guess that is what late nights will do to you when you're working on projects!


Hugs,

Stephanie

Tuesday, May 17, 2011

Mother's Day Card

Here is the Mother's Day card that I made for my mom for Mother's Day. The font on the front is an SVG file from MyScrapChick.com. The background was just cut a little smaller than the card. The flower paper is from DCWV and is called Assorted Splats. I love it!!


The inside came from Martha Stewart. All I did was fold some squares of paper and trace a petal shape onto them, cut them out and assembled it. I thought it was really cute! I love the pop out part of it. You can get all the instructions on her website. The reviews of the craft said that a lot of people had a hard time following the directions. I didn't think that it was hard to follow at all. I made it in one shot.

Well, have a great Tuesday!!!

Hugs,

Stephanie

Birthday Invitations


One of my daycare parents had asked me if I could make her baby invitations to her first birthday party. I was so excited!!! I was a bit nervous though because I wanted her to love them!! I wanted it to be over the top too!!! This is what I came up with. The invitations came from a package of plain cards with envelopes. We bought most of the supplies at JoAnn's. The cupcake came from the Doodlecharms cartridge. It was cut at 3 1/2" using the blackout feature. I embossed the icing with the swirl embossing folder. The number one candle came from Sweet Treats and was cut at 1 3/4". I had to cut it twice. Once with yellow paper and then again with the flower paper. I then cut the flame off of the flower candle. The scalloped border is from the Plantin Schoolbook cartridge. It is cut to fit the length of the card which is 5 1/2". You can't really tell but there is a layer of transparency that I have printed out from my computer. The layer says Sugar and Spice and everything nice.......That's what little girls are made of. I created this on my computer and printed them onto the correct transparency. I held the card and the transparency together with an eyelet.


This is the inside of the invitation. I printed from my computer the party details which I have covered up at the bottom. I wanted to do a pop up and fell in love with this cake that came from Extreme Cards and Papercrafting. It took a little bit to put together as I had about 25 to make in all but it was worth it. I just love this dotted paper. The scalloped circle is from Sweet Treats again. It is one of the flowers.


Here is a close up of the cake. The one is cut using Sweet Treats and using the shift feature and the one candle button. It is 1 3/4". I discovered a feature on my Cricut. The flip button!! I pushed the flip button and redid the one and it flipped it. I used a wire through the center of the cake to be able to glue a one onto the top of it. It was interesting trying to work out all the details of this but in all, she was happy with the end results and that is all that matters!!!


Thanks for looking and have a wonderful day!!!

Hugs,

Stephanie


Thursday, April 7, 2011

Peanut Butter Easter Eggs


Hi Friends! It has been a long time! This semester has been consuming every last minute of my time. It is almost over and I am looking forward to spending some time crafting!! Check back in a couple of weeks when I am able to get back in the swing of things.


In the meantime,

Here are some awesome but simple peanut butter eggs that anyone can make for Easter. As a matter of fact, my two oldest children made these in first grade. I kept the recipe and decided to dig it out today to do with my kids and my daycare children. We had a great time making and eating them! :-) The recipe is:


Peanut Butter Easter Eggs

2 cups of peanut butter

1/2 cup of brown sugar

1/2 cup of melted butter

1/2 tsp. vanilla

2 cups of powdered sugar


Melt butter. Add peanut butter, brown sugar, and vanilla. Add powdered sugar last. Shape into easter eggs. Chill. Cover with chocolate and decorate.


For the chocolate, I just bought a bag of the chocolate wafers in the craft section of the cake aisle. You can get them at Wal-Mart or the local craft stores. I like to buy mine from the craft stores because they will go on sale. I just used the milk chocolate but you could use whatever you like. I put the wafers in a glass bowl and pushd time defrost on my microwave. I did it for 45 seconds at a time. After each time, I stirred them up. Each microwave is different so times will vary. Once the chocolate is melted, I placed one egg into the bowl at a time and turned it over to cover all sides. I used a fork to place under the egg to allow some of the chocolate to drip. Laid them onto wax paper to set. I did take a spoon after they all were covered and drizzled more over top each egg to dress them each up a bit.


Needless to say, they were a big hit!! I'd love to hear what you are doing for Easter. Any crafts or great recipes that are favorites for your family???

Hugs,

Stephanie

Sunday, March 6, 2011

Hair Bows/clips


Hi Friends!! I have a four and a half year old that doesn't ever want to do anything with her hair. When she was little, I could fix her hair everyday. Oh how I miss those days! It is a struggle just to get her to brush it let alone fix it in any way. I have been into some of the stores at the mall and have seen some pretty cute hair clips for little girls. My daughter loves them but I can't bring myself to pay those prices as I know that it doesn't cost a fraction of what they are charging to make them. I decided to try to make them to see how they might turn out. I first went to google and googled hair clips/bows. Then was sent to youtube from google. There are a ton of videos out there on how to make different kinds of bows. I wanted to find out how to make the korker bows. The basic directions on how to make them is to bake them in the oven! Who knew!!


The videos said to wrap the ribbon around wooden dowels. It was a Sunday evening when I went to Wal-Mart. While I was there, the idea popped into my head so I had to get everything to make them. I searched all over the store looking for wooden dowels but came up empty. I decided to check out the kitchen utensils. I thought, maybe there would be some wooden skewers that I could use. The skewers were to small but hanging right beside them was a package of wooden spoons! Problem solved! I would use the handles of the wooden spoons in place of the wooden dowels. Getting back to the directions, you wrap the wooden spoon handles/wooden dowels with the ribbon. Secure the ends of the ribbon with some wooden clothespins. Bake them at 275 degrees for 25 minutes. Let them cool and then unwrap them.


The brown clips were put together with my hot glue gun. First of all, I hot glued the ribbon to the outsides of the alligator clip so that the metal part of the clip wouldn't show. I found the alligator clips at Wal-Mart back in the sewing/beading section. They came in a pack of 12 for $2.00. You can also purchase these at the craft stores as well.


I then put the spiral ribbons together by finding the centers and gluing them together alternating so that they didn't stack on top of each other. To finish it off, I added a yellow button to each center. Voila!!!
The black and white clips were made by seeing some at the craft store. I made up how to make them on my own. I cut the ribbon at 6 1/2 inches long. I used four strips of ribbon for each clip. I folded the ribbon to find the middle. I then took my hot glue gun and glued the edges to the center overlapping them just a tad.


I then stacked them on top of each other gluing them down one by one. To finish it off, I added a yellow button. My daughter picked the color of the button out. Yellow is her favorite color so yellow was the choice. I did wrap the alligator clip with ribbon again to hide the metal.


The fuchsia and lavender clips were done using the korker spirals. I put them together to where there were four ends on each side. I held them together by sewing the ribbons together in place. I did this so that they wouldn't move while I was making them. I then wrapped a small piece of the ribbon around the center and hot glued it together to complete the center. I attached it to the wrapped alligator clip and there you have it! You'll want to make sure that you seal the edges of the ribbon so that it doesn't fray. I used a lighter and melted the ends just a tad.
Hope you have enjoyed these! I'd love to see and hear what all you have made by doing some of these techniques! My daughter is so excited about them and I really hope that she will wear them and it won't be so much of a trouble to get her hair fixed!! :)
Happy Crafting!!
Hugs,
Stephanie


Saturday, February 26, 2011

Baby Mini-Album

Hi Friends! Here is a baby mini album that I made for a friend of mine. She had a little girl. I super love this pape that I bought from JoAnn's. The album is made from chipboard. The cover and pages come from myscrapchick.com. My friend didn't have a name picked out so I told her that once he decided, I'd put the baby's name on the front.

My Mom told me that I should make something to put on my crafts that said that it was homemade. So, here is what I made to put on the back.


I stickled a heart onto this clear tag that I had bought from Wal-Mart years ago! The pocket that the tags are in is a flattened toilet paper tube covered with scrapbook paper. The tags pull out and are great for adding journaling or more pictures. I inked the edges of the album.


The butterfly is cut using New Arrival cartridge.


I just love lavendar and green together!!! The hearts comes from George cart.


I love this duckie paper. I made some diaper invitations once when I helped with a duckie themed baby shower. All of the cuts are from the New Arrival cartridge. I ran the duckie through my paper crimper.


I made this fold out to display some pictures and tags. Embossed the It's a Girl box using my Cuttlebug. The baby rattle again comes from the New Arrival.


Here it is folded and tied shut with some ribbon. Made the flower on the opposite page with the Cricut. I think that the flower is from George cart but not to sure. Added a crystal gem to the center for some sparkle.


The BABY squares were cut using the George cartridge. It is the signs with the sticks cut off. I glittered them for sparkle!


I seperated the two pages into quadrants using the white rick rack. Used the buttons to add a final end to the rick rack. I stamped the heandprints and the cutie pie circle. Pop dotted them to add interest. You can hardly see it but on the right page at the very top square is a cut out of a stork. It is a cut from New Arrival.

I wanted to add a little bit of blue somewhere in the album. I embossed these with the cuttlebug. Precious and the flower came from Plantin Schoolbook. Added a little bit of blue ribbon to tie the two pages together.


I made the envelope from (I think) Tags, Bags, Boxes and More cart. I added a gift card in the envelope for the parents to be to buy something that they needed and didn't have yet. The footprints are from New Arrival.
It was so much fun putting this together. I am going to work on another baby album for another friend who is expecting a boy. I'll post pictures when I am done.
Have a safe and enjoyable weekend!
Hugs,
Stephanie