Saturday, July 31, 2010

All Grown Up Layout


Here is a layout I did about my daughter. I was surfing the net and found this blog called pencil lines. I entered this into their monthly challenge. I used their sketch #197. (I can't get the sketch to post so here is the link: www.pencillines.com/2010/07/sketch-197.html )


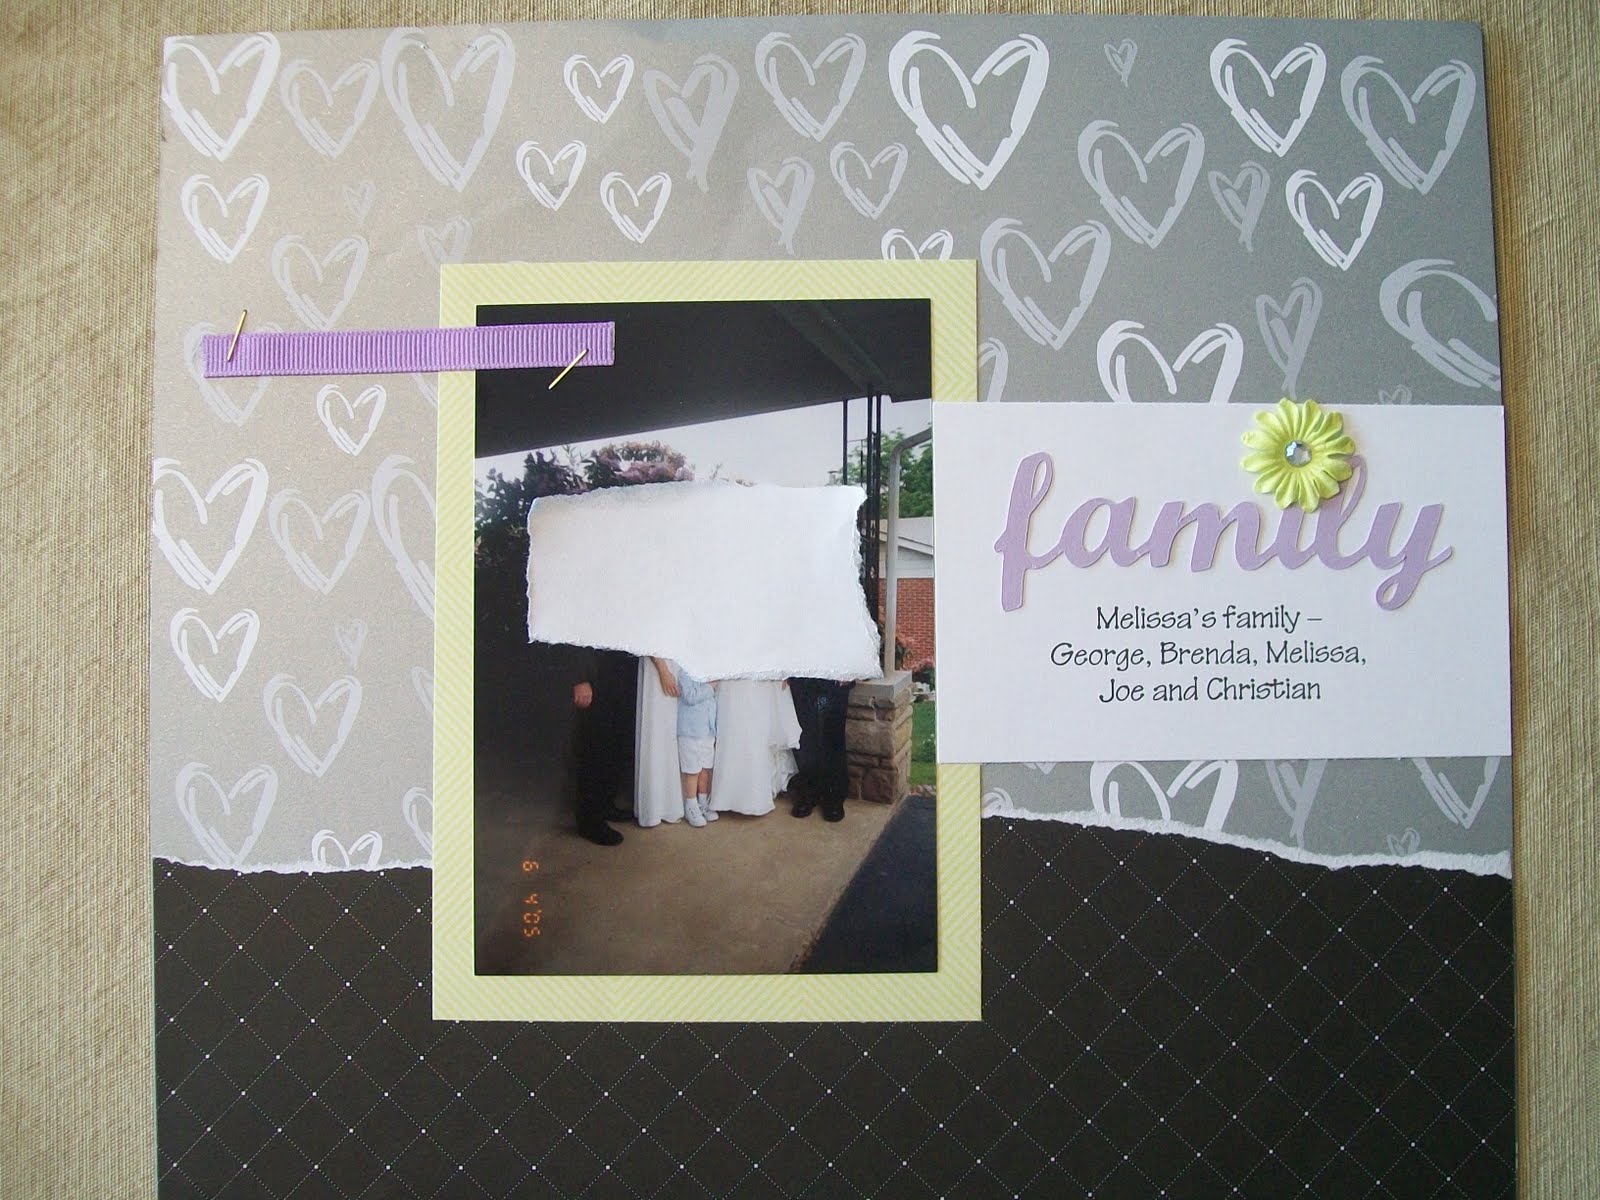
I took these pictures a couple weeks ago and was going through a pile I had just developed. I came across these and knew these were what I wanted to use for the layouts. She was "hangin out" with some friends in the backyard. I had my camera taking some pics and snapped a few of her. When I saw these, it made me realize how grown up she is. She will be starting middle school on Monday. I feel so old!! LOL A couple of days after these were taken, we were driving to the store and in conversation, I asked her why she didn't play with the younger girls in the neighborhood anymore. She basically told me that they play immature games. So, I titled the page "so grown up" because that is what she is becoming. The papers I used come from My Minds Eye. I did use Make The Cut software to cut the bracket. It came from myscrapchick.com. My software had closed before I could write all this down but I think it was cut at about 7 in wide by 8 1/2 in. tall. I faux stitched the edges. The green and blue polka dot paper is 2 1/2 in. x 8 in. I added some yellow buttons down the side to give the page a little pop of color. The striped paper was cut at 2 in x 8 1/2 in. I used a Martha Stewart punch to add a little bit of extra to the edges. The title was also cut using some black card scraps. It was cut with Make The Cut software using Script MT bold font at 1 inch high. The photos were cut down to 3 in. x 5 in. and 3 1/4 in. x 4 in. The 3 x 5 was matted using some floral paper from My Minds Eye too. The journaling was computer generated using Teen font. I then cut it out with decorative scissors and inked the paper. I added a few flowers from my stash and there you go! Thanks for looking and leave some feedback! I love to hear what you think.


Hugs,


Stephanie


Thursday, July 29, 2010

My First Vinyl Project


Hi everyone! This is my first vinyl project. I am so excited about it. I made these for my Dad for his big rig. He wanted his nickname and his dog's name to go on the doors of the truck. I used Make The Cut software to cut them. The font is script MT bold. Wishful Thinkin was cut at 1 inch high by 10 inches long. Oreo is 1 inch high by a hair shy of 4 inches long. I was surprised at how thin the vinyl was once I started to pull the negative side off. I actually had to cut Wishful Thinkin twice because I wasn't very careful and pulled off one of the quotation marks. I had already balled up the negative part and it was still attached so I couldn't save it. My dad was thrilled to get them! He actually wants me to redo all of the lettering on his truck. I am looking forward to doing it!! Hope you have a great day!!


Hugs,


Stephanie

Tuesday, July 27, 2010

Beautiful Layout


Hi everyone! Boy, I am on a roll this week! I have another layout for you. These are pictures of my youngest daughter. This would have to be my favorite layout. I just love these pictures too! I used a sketch from Scrapbook Sketches from Scrapiopath. I used Make The Cut for all of the cuts on the page. Paper is from DCWV - Flower Shower Spring Stack. I cut a scalloped circle at about 11 inches. The green frame came from myscrapchick.com. It is the 2 piece doodle frame. I just used the top frame. I enlarged the frame to 5 inches wide by 8.25 inches tall. The pictures in the frame are cut at 4 x 4". I used Make The Cut to cut the word beautiful. It is 1.5" x 4". I also stickled the title as well. The heart above the i is a sequin from my stash. The flowers are cut using yellow card stock. I used the Tags, Bags, Boxes and More cartridge and cut them at 2 inches. I have a stash of buttons that I added blue buttons to the centers. The journaling is Tangerine font and just printed off the printer. That about covers it.

Monday, July 26, 2010

Football/Cheer Layout


Hi everyone! Here is another layout for the LID challenge over at Cricut.com on the messageboard. I chose pictures from 2008 football/cheerleading season. They are pictures of my two children and my two nephews who played that year. I started with paper from Colorbok - School Life. It is the football field paper. I first cut a megaphone from maroon Bazzill card paper. I cut it out a 6". The cutfile is from the MTC gallery. Next, I cut GO LIONS from white cardstock using MTC. Century Schoolbook font was used. The word "GO" was cut at 1/2" and the "LIONS" was cut at 1". I then used the Desgin Studio to cut the tags for under the photos. I used Tags, Bags, Boxes and More cartridge. I pushed the shift button, mirror/window button and lgcrc2-h button to cut out the tags. They were sized in DS at about 3 1/2" long and 3/4" tall when folded down. I then cut out a grey rectangle to fit under the window. I glued the grey cardstock to the tag and glued the window down to form the tag. I added some handwriting and attached them under the pictures with some black brads I had laying around from a long time ago. The football ribbon was also in my stash. Above the journaling, I used footballs cut out from the football svg file from treasureboxdesigns. It was cut at about 1" long. I then cut white and silver ribbon at 3" in length and tied them together. I just attached them to the top and bottom of the journaling. The journaling was done on my computer. For the title, I used Earwig Factory. I think this is a really fun font to play with. The rest of the journaling was done in Tinker Toy. I inked the edges too. That about sums it up. Thanks for checking out my blog and have a great day!!!


Hugs,


Stephanie

Beach Layout


****I can't figure how to get the 2 page layouts to show up without chopping half of it off so if you click on the image, it will show you a close up. *****


Yesterday, I finished a 2 page layout from the Cricut Messageboard for this weeks LID Challenge. I used Tropical Treasures svg file from myscrapchick to cut the sun, the beach balls, the waves and the shovel and pail. For the sun, I cut it at about 4" - I think. I chalked the edges and faux stitched it with a black pen. For the center of the sun, I ran it through my printer using Tangerine font and then popped it. The beach balls were cut at about 1" and just glued together. I duplicated the wave and welded them together to get a line of them. I cut them at about 3" and then chalked them with white chalk. I tore a border of tan paper to represent the sand. I also chalked it with a little bit of brown. I'm not sure the size of the shovel and pail but it was cut and popped too. The journaling (which I am not to fond of) was just printed in Word using Curlz MT font. I cut the lines apart, inked with blue ink and staggered them some. The paper is from Happy Trails Beach Toss. Thanks for looking and would like to hear what you think!!


Hugs,


Stephanie

Sunday, July 25, 2010

Help Help Help

Hi again! I am struggling with posting pictures on my blog. I want to post bigger pictures so the detail can be seen better. I have tried using photobucket and resizing my pictures. It makes them bigger but when I bring them into my blog it cuts half of the picture off. Can anyone help me out here? I am new to all the blogging and not sure what all I can and can't do. Thanks for any help that anyone can give me!!! I so much appreciate it. What does everyone else do with their blogs? How do you import pics and what programs if any do you use?

Aquarium Layout


Hi everyone! Hope you are staying cool this weekend! We were out in the 100 and some degree weather yesterday. My oldest daughter had softball tournaments Friday and yesterday. They won their game Friday and then lost two games yesterday. I think the heat worked a toll on them. It was fun needless to say. Today, I have a two page layout I did from when we went to the aquarium last summer. I love the fish paper from Cosmo Cricket called Snorkel: School's out. The purple mats for the photos came from DCWV Flower Shower Spring Stack. The rest of the paper was scraps laying around that I wanted to use up. I used the Sea Treasures svg file from myscrapchick for the fish, the seaweed, starfish and the snorkel boy. I chalked the edges of the cuts. The water was cut from card stock using the Creative Memories wavy cutting system. It was the first time I had used it. I had a hard time for some reason. It didn't want to cut all the way through the paper. It probably was just me though. Anyways, hope you enjoyed it as much as I enjoyed putting it together. Enjoy the rest of the weekend and stay cool! :)


Hugs,


Stephanie

Sunday, July 18, 2010

Frosty Fun!


Hi again! I have been on a roll this weekend. I created this 2 page layout today and wanted to share! The snowman and the title is from the snowman collection at myscrapchick.com. I just love their paper piecings! You can't see it well, but I did stickle the snowballs and the fun in the title. Stickles is becoming my most favorite piece of scrapbooking must haves! I used paper that I had bought in a paper stack years ago at Wallie World. This was the first time that I have used it. It was so much fun to put together! I'd love to hear what ya think! Does anyone know how to get my pictures to post bigger? You can't see much detail and I'd like to be able to show the detail more.


Hugs,


Stephanie

Finished with the Wedding Album! :)


Hi everyone! If you have been following my blog, I have been working on an album from when my daughter was in a wedding. I finally finished it yesterday!! I am so excited and love how it all turned out! The two page layout is a LID challenge this week over on the Cricut Messageboard. This was my first time participating. I used Make the Cut and the wedding cart for the titles and all of the wedding themed embellishments. You can't see to well, but I stickled the cake and the wedding bells. Thanks for looking and I'd love to hear your feedback on my work and my blog!
Hugs,
Stephanie

Thursday, July 15, 2010

Thank You Card


Hi again! I wanted to share with you a Thank You card that I made this week for one of my daycare families. I have been caring for their child for a year now and they brought me a giftcard for PaPa John's thanking me. I was really surprised and who doesn't like pizza especially when it will mean I won't have to cook dinner some evening!! :) I used DCWV blossoms and butterflies paper stack. Using the George cart, I cut a 6", 5", and a 4" circle out of 3 contrasting papers. I glued them down to the left of the card and cut off what hung over. I then used Make The Cut to cut out the butterfly (came from the MTC gallery) and used Tangerine font to cut Thanks. I embossed the butterfly with Swiss Dots and popped it. Added 2 blue jewels and then faux hand stitched the two outer edges of circles. Thanks for looking and have a great day!!!


Hugs,


Stephanie

Tuesday, July 13, 2010

More Wedding Layouts


Here are the last of the wedding pictures I have scrapped so far. I love the bride and groom. It was cut using Make The Cut with an SVG from myscrapchick. They turned out super cute!!! I left the groom bald as the groom was bald too! :) The titles were cut using Make the Cut with various fonts. Hope that this inspires you if you are looking for some ideas! Thanks for looking and I'm always eager to hear what you think!


Until next time,


Hugs,


Stephanie

Wedding Layouts


Here are some more of the wedding layouts that I have created. Again, I created the family title from Make the Cut using Script font. The LOVE was cut using the Make the Cut as well. The rest of the titles were computer generated and/or stamped. The flowers from the Bridal Party LO is from Plantin. I bought some pearl accents from my local craft store and used them for the centers of the flowers. The hearts on the last page were cut using the George cart. I'm not to good at explaining details so if you'd like to know specifically, let me know and I will get the details to you.

Thanks for looking!!

Stephanie

Wedding Layouts


Hi everyone! My computer charger had died and so I needed to order another one. I wasn't able to access the internet for about a week! WOW! It was tough! LOL! You know it is amazing how much we rely on technology nowadays. Then we had company come for a visit. So I haven't had much of a chance to post anything new. After my company left, I have been working on some wedding layouts. My daughter was the flower girl in a friend's wedding a few years ago. I have been wanting to scrap them. I wanted to do a black and white album - paper that is. I have been looking for the right paper and came across some about 2 weeks ago when my sister-in-law and I were out shopping. My thought was to just do black and white. I found some paper from Me & My Big Ideas and DCWV. I couldn't decide. I asked my sister-in-law her opinion and she said the Big Ideas paper pack. It consisted of black and white with some color in it. I was hesitant and bought it anyway - besides it had more paper in it which was a bigger plus. So, after I started working with the paper, I am so thankful that I did buy it. The touch of color just adds that extra special touch! I am happy that I did buy it and so, here is what I have been working on over the last week. The third layout was one of my favorites!! I didn't use the Cricut for this one but love it!! I used make the cut for the titles and brackets and the Wedding Cart for the swirls. Thanks for looking!
Hugs,
Stephanie