Wednesday, December 29, 2010

Snowflake Card


Hello Friends and Family,

I have a snowflake card for you to check out for today. I was inspired by a Christmas card that I had received and then tweaked it a little. I made four of them. Three of them will be used as Thank You cards for Christmas presents that I have received. The last of the four - I plan to send to my Grandma for her birthday in January. I love how these have turned out! They can be any kind of a card really. I used some light blue card stock that I had purchased from Wal-Mart years ago for a baby shower. It was 8 1/2 x 11". I cut it in half to make 4 1/4 x 5 1/2". I folded them in half to make the card. I then embossed the front of the card using the Cuttlebug. The embossing folder that I used was sledding. It has some really cute words related to snow and winter in different blocks. There is also a picture of a snowman and some snowflakes. I cut out a snowflake from a svg file that I found online. It is from scrapcoloring.com. The name of the file is snowflake_thick. The finished size is approximately 3 1/2 x 4 1/2". I used white card stock for the snowflake. I did do a multi-cut of 2 to get smooth clean edges. The next thing that I did was stickle the entire snowflake with crystal stickles. (I just love this color of stickles! I use it all the time.) After it dried, I cut a hole in the edge of one of the snowflake ends. I added a gem to the center of the snowflake to add some pizazz! I then used some white ribbon I have had on hand for forever and tied it around the center of the card. I attached the snowflake. I then pop dotted the center and edges of the snowflake to allow it to stand away from the card and to help the snowflake stay in one place. That is all there is to it! The longest part was waiting for the stickles to dry! Well, hope everyone is having an enjoyable day! Hope you stay warm as well!
Until next time......
Hugs,
Stephanie

Tuesday, December 28, 2010

Thank You Card


Hello Family and Friends!! Here is a Thank You card that I made for all those gifts that I received at Christmas. I used the Penguin and Snowballs from the Polar Bears Collection svg file at MyScrapChick.com. The cards are the 5 leftover cards from my Christmas cards. They come from DCWV the Winter Combo Box of Cards from my local craft store. I loved his one but couldn't figure out how to incorporate a snowman onto it without losing the big snowflake. All of these were cut using scraps of paper laying around from other projects. I chalked all the edges of everything except for the snow. I stickled the snow mound, the snowballs and the big snowflake on the card. I placed a blue gem on the center of the snowflake and wrote Thank You on the sign using a black marker. That was it! Easy to put together.
Thanks for checking it out! I'd love to hear your feedback.
Hugs,
Stephanie

Monday, December 27, 2010

Christmas Gift Box


Here is a gift box that I made for my Grandma to put gift certificates to McDonald's in. She loves to go to McD's and get their lattes. (I'm not much for anything other than hot chocolate.) I used Tags, Bags, Boxes and More cartridge to cut this out. It is the crayon box. The paper is from My Minds Eye. It was super easy to put together! I slid the gift certificates in and then tied a ribbon around the box. I used the winter faces cut file from MyScrapChick.com for the tag. I think the tag was cut from Tags, Bags, Boxes and more as well. (I don't have a size for you. I am super bad at just making the item and then realizing, "Oh I need measurements for my blog." I'm going to try to make a better effort in the New Year to do that. I used Design Studio and measured the box and the gift certificates and just made sure that I had enough room to put them in and be able to close the lid.) I added a little detail such as the eyes and mouth. Not sure if I chalked the cheeks but on my Christmas cards, I did. Attached the tag to the ribbon and there was her gift. Hope you enjoy looking at it. I loved it.

Hugs,

Stephanie

MERRY CHRISTMAS!!


MERRY CHRISTMAS EVERYONE!!! (a couple days late ;))
I hope that each of you have been as blessed as I have this year!! We had a relaxing weekend together just my husband and our children. We will celebrate Christmas this weekend with my family when my parents will come down to visit. I have been blessed with some wonderful daycare parents and friends that have given me giftcards to all the local craft stores in my area!!! I can't wait to use them!! :) I have decided one project that I want to do and will use the giftcards for. I want to make a huge picture to hang in my playroom. I am going to block off a canvas and with my Cricut cut out different images and letters of the alphabet. I was at my children's doctor when I saw the inspiration hanging on the wall there. The only difference is that I will use my Cricut to create all the different images and letters of the alphabet. You'll have to keep checking back to see how it turns out!! If anyone has any great ideas similar to this one, I'd love to hear them!!
Anyways, hope you all had a wonderful Christmas and soon to be Happy New Year!!
Hugs,
Stephanie

Thursday, December 23, 2010

Christmas Ornament


So friends.... I need to take a moment and share with you the cutest thing ever!!! I was sitting in the rocking chair rocking one of my daycare babies. I was looking at our first ever real Christmas tree and admiring how nice it looks. I noticed that there was this black ornament on our tree. I don't remember ever having a black ornament except for my son's Darth Vader ornament when he loved Star Wars from years ago. I kept starring at it and wondered what in the world is it! Then I laid the baby down once she was asleep and came back to the tree to take a closer look. Well, this is what I found! My four year old daughter found my thumb drive and saw the hook on the bottom and thought it would be neat to hang it with the rest of the ornaments!! ;-) I just had to take a picture and share with everyone! It made me laugh and giggle!! Hope you do the same!!

Hugs,

Stephanie

Christmas Card


Here is my Christmas card that I made for all my friends and family! I used the Winterfaces file from MyScrapChick.com! I bought a box of DCWV box of Cards. They were the Winter Combo Cards. I decided to use them because they were on sale for 50% off. They came with 40 cards and envelopes. I didn't have to buy the extra paper for the cards. They came in different designs so not all of them were exactly the same. I didn't take pictures of all of them which I am regretting now but oh well. What is done is done, right. So I sized the SVG to make the snowman fit exactly across the front of the card. Cut all the details out and assembled onto the card. It was so easy to make!!! My four year old helped as well! ;) We pop dotted the knot to the scarf and then chalked the cheeks. Added a few details like the mouth and Voila!! A Christmas Card is born! We did about 35 of them in one evening! I needed something quick and easy as it was December 13th before I could even start on my cards. I ran super late this year due to going back to college. Well, hope you enjoy!
Hugs,
Stephanie
Christmas Candy Box


Hello again friends! I thought I should update my blog today with all the projects I've worked on so far. I guess it might be a little bit late for anyone to grab any ideas but maybe you could tuck them away for next year! ;) Here are some gift boxes that I made using a SVG file. It comes from MyScrapChick.com. (Have I mentioned that it is my favorite site to go to? And no, I don't get paid to say that or do I work with their design team although I think it would be AWESOME!!) I used My Minds Eye paper from the Sweet Dreams Holiday Avenue. The SVG is called pieboxwindow. I sized it to fit as big as possible on the page. I bought some transparency paper and used that for the window. The circles that are cut out from the box, I used as tags. I made some peppermint bark and placed in a bag and tied with a ribbon. I then tied the entire box with another ribbon. I made these to give to my kids teachers for small gifts for Christmas. I also placed a couple of them in the center of a plate of cookies.


Here is the recipe for the peppermint bark. It is SO EASY and YUMMY!!! It has become a favorite by everyone!!!


2 bags of Vanilla flavored Candy Wafers. (I bought mine from my local craft store. I also used the plain white wafers.)

10 candy canes


Crush the candy canes up in a ziploc bag. Reserve 1/4 cup to sprinkle on top. I melted the wafers in my microwave. I push time defrost so that the chocolate doesn't burn. I do 30 seconds at a time and then stir it up. Once it is all melted, I add the crushed candy canes. I line a baking sheet with wax paper and then pour the candy onto the baking sheet. I then sprinkle the 1/4 cup of candy canes on top. I place mine in the fridge to set for 10-15 min. Then you just break up into pieces however big you want.


That is it!! So Easy and everyone LOVES them!!!

Enjoy!

Hugs,

Stephanie

Christmas Frame


Hi friends! I have been super busy getting ready for Christmas. I'm sure everyone else is as well. I keep thinking of things to make and give as gifts. Today I have made a really cute frame. I made two of them. One is for my mom that I am going to be putting my kids picture in and the other is for my four year old to give to her best friend who happens to live next door! I used an SVG file from my ultimate favorite place MyScrapChick.com. I used the Snowman Collection. There is two files that I used. I brought in the winter frame and the winter frame 5. Then I resized them both to 4 3/4 x 6 3/4. I then used my Cricut to cut out all the pieces of the frame and snowman. I deleted the eyes, mouth, scarf ends and holly. They were too small to cut for my liking. I assembled the snowman and attached it to the frame. For the scarf, I just cut the ends to make it look like tassels. I added the snowman face using a black marker and chalked the cheeks. The paper I used for the frame came from a a paper pad I had bought years ago at Wal-Mart when I first started scrapbooking. The snowman is made from scraps. I stickled the snowflake centers as well as the outside of the snowman's face. Once I attached the photo to the back, I used paperclips and attached them to the back of the frame to allow it to stand up. You could do a couple different things. I've also used magnets on the back to hang on the fridge as well. I think they are super cute!! I'd love to hear any feedback as well as any other ideas you have done for Christmas gifts.


Thanks for stopping by!


Hugs,


Stephanie

Thursday, December 16, 2010

Gift Card Holder


I have been working on a lot of projects for Christmas this week! I am so excited to have some free time to be working with my Cricut again!! Here I have made giftcard holders for my niece and nephew. I used the pillow box from the Tags, Bags, Boxes and More Cricut cartridge. I used Design Studio to enlarge it to the size I needed for the gift card. The paper is from My Minds Eye. I wrapped a ribbon that I had from a long time ago. The tags are made from a SVG file from my favorite website - MyScrapChick.com. It is the ornament from the Christmas 2 Collection. I just used some scraps to make the tag. Attached it to the ribbon and Voila!! It was so easy to make. I'm sorry that I don't have the dimensions of the cuts but I made them a couple weeks ago and just finished the tags earlier in the week. I'd like to hear how everyone gives Gift Cards.


Hugs,


Stephanie

My Birthday Surprise!!


Monday was my last day of finals for school for the semester!! YEE!! HAW!! It was also my birthday! :) My husband left to go out of town early Monday morning so we didn't get to do the birthday thing Monday. He sent me some roses and surprised me! My son said, "Mom, someone is parked in front of our house!" (He doesn't like it much when other people park in front of our house. It bothers him that they would park in front of our house.) Then he says, "Mom - it is some old guy and he is coming to our door!" I opened the door and he was carrying a dozen of roses! How sweet!!! My diningroom table smells so good that I have found myself sitting at the table just to enjoy the smell of the roses. I have attached a picture of the roses. Of course, they don't last long and already are starting to bloom and drop but what a sweet thing. My husband hasn't sent me flowers in such a long time! I sure am enjoying them though!! I just hope they last until he comes home so he can smell them and see them looking somewhat nice! Anyways, with school finished for about a month, I have started the creative juices and pumped out some Christmas cards in one evening, gift card holders, and some boxes. I will be posting more later tonight!

Hugs,

Stephanie

Friday, December 3, 2010

Cheer Cupcake Boxes


Hello Friends and Family,


I have another project I did during my daughter's cheer season. We had to bring in snack for the girls after a game and so I decided to make some cupcakes. Actually, that is what my daughter requested that I make. I couldn't of course just send in cupcakes without making them adorable! I came up with this cupcake box. I used the Tags, Boxes, and more cartridge to create the box. Their team colors were blue and gold. I then used the cheerleader SVG file (from myscrapchick again) to cut out the pom poms. We had to use two different colors to give it more pizazz. The megaphone comes from the same SVG file. The word cheer is welded together in Make The Cut software. H S is cut from it as well. All we did is assemble the boxes and glue the images on each side, put a cupcake inside and closed it up. They were a big hit after the game!


Thanks for looking and I appreciate all your comments.


Hugs,


Stephanie

Hello Friends - Halloween Treat Boxes


Hello Friends!! It has been a super long time since I have posted any projects!! :( I am sorry to be neglecting my blog for such a long time. I've gone back to school and so most of my spare time has been spent doing homework/stuff for school or taking my children to football and cheerleading. I have created just a few projects that I am going to take the time to post here. The semester is almost over so I am looking forward to a break for the holidays as well as a chance to do some crafting!! My first project to show is these adorable pumpkin treat boxes. I used an SVG file from myscrapchick - which is my favorite place to buy from!! I used orange cardstock that I bought from my local craft store. I can't tell you what color it is as it has been awhile since I used it. I inked the edges of the pumpkin. I also pop dotted the center part of the pumpkin to give some dimension. I wanted them to have a handle so I wrapped pipe cleaners around a pencil and expanded them. I inserted them into a hole I made on each end of the box and Voila! I thought these were super cute and an easy thing to make.
I will be posting more to catch you up to date of what little I have done.
Hugs,
Stephanie

Saturday, August 14, 2010

Collecting Seashells by the Seashore


Hi friends! I have another layout that I did using the sketch from the Cricut messageboard for this week. These are pictures from last summer when we went to the aquarium. It was our first time going there. We stopped at the beach on the way home. We didn't pack and swimsuits because we didn't really know it was that close to the beach. I told the kids not to get their clothes wet because we didn't have anything else to change into. Well, needless to say, they all went home wet! :) It was a fun time! These are pictures of my youngest. She loved to play in the sand and collect the seashells. The paper is from a pack I bought along time ago when I first started scrpping. I didn't care much for it because it was really thin but I liked how the colors changed. The little stars and seashells are a svg file I got from Paper Scissors Ink blog. I inked the edges of all of them. For the title, I added the letters myself. Seashells and Seashore were cut using the font stoneage. It is about 1" high. The duck is from myscrapchick. I embossed the outfit with the swiss dots embossing folder. Thanks for looking and leave some feedback of what you think!
Hugs,


stephanie

Monday, August 9, 2010

Back To School Gift Bags


Hi y'all!! It is back to school time for my kids. They started school last week. I volunteered to bring in small and medium gift bags as wish list items for my daughter's homeroom teacher. I went to the Dollar Tree and bought the bags 2 for a buck. I then went home and put my wonderful Cricut to work! I used colored card stock from the craft store in solid colors. I used Make The Cut to cut the images. The school bus, pencil, scissors and glue came from an SVG file from myscrapchick called School days. The chalkboard and apple was an SVG but I'm not sure where it came from. I just sized all of them to a size suitable for the bag. I added a school themed ribbon to some of the bags to dress them up a bit. I loved it and want to get started with the back to school layouts by using the SVG files. My daughter took them to school today and the teacher loved them!! She said that she didn't want to give them out because they were to nice! :) I'm just thrilled that she liked them!

Hugs,

Stephanie
Sunday, August 1, 2010

Just A Swingin!


Happy Sunday everyone! Today I have a layout I did of my daughter. She just learned to pump and keep swinging this summer. She loves to swing! It is kind of nice not to have to push her too! I used DCWV and My Mind's Eye for the patterned paper. The rest is card stock from the craft store. The background was cut using Make the Cut software. I cut a scalloped circle and used it on the "beautiful" layout. For this one, I used the negative side of the scallop and glued it to the white butterfly paper. I matted the middle picture with some green dotted paper from My Mind's Eye. "JUST A" was created using Make The Cut again cutting out from white card stock 1/2 inch size circles. I then stamped the letters onto each circle from some stamps my mom picked up for me. "Swingin" was cut again using Make The Cut software with Rockwell font at about 1 1/2 inches tall by 5 inches wide. It was cut as bold font too. I cut it out two times. Once with orange cardstock and one with black. I then glued the two letters together allowing part of the black to peep through to make it stand out a bit more. The bird, tree branch and girl all came from myscrapchick.com. I chalked the edges and popped the hands. The journaling was computer generated using Kids 4 Fun font. I cut each line apart and glued them down. Thanks for looking and enjoy the rest of your weekend!!


Hugs,


Stephanie

Saturday, July 31, 2010

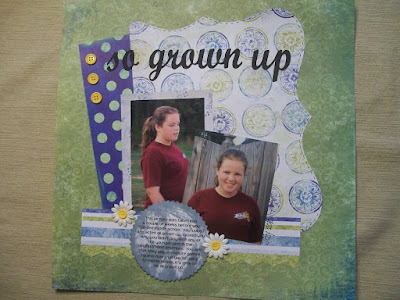
All Grown Up Layout


Here is a layout I did about my daughter. I was surfing the net and found this blog called pencil lines. I entered this into their monthly challenge. I used their sketch #197. (I can't get the sketch to post so here is the link: www.pencillines.com/2010/07/sketch-197.html )


I took these pictures a couple weeks ago and was going through a pile I had just developed. I came across these and knew these were what I wanted to use for the layouts. She was "hangin out" with some friends in the backyard. I had my camera taking some pics and snapped a few of her. When I saw these, it made me realize how grown up she is. She will be starting middle school on Monday. I feel so old!! LOL A couple of days after these were taken, we were driving to the store and in conversation, I asked her why she didn't play with the younger girls in the neighborhood anymore. She basically told me that they play immature games. So, I titled the page "so grown up" because that is what she is becoming. The papers I used come from My Minds Eye. I did use Make The Cut software to cut the bracket. It came from myscrapchick.com. My software had closed before I could write all this down but I think it was cut at about 7 in wide by 8 1/2 in. tall. I faux stitched the edges. The green and blue polka dot paper is 2 1/2 in. x 8 in. I added some yellow buttons down the side to give the page a little pop of color. The striped paper was cut at 2 in x 8 1/2 in. I used a Martha Stewart punch to add a little bit of extra to the edges. The title was also cut using some black card scraps. It was cut with Make The Cut software using Script MT bold font at 1 inch high. The photos were cut down to 3 in. x 5 in. and 3 1/4 in. x 4 in. The 3 x 5 was matted using some floral paper from My Minds Eye too. The journaling was computer generated using Teen font. I then cut it out with decorative scissors and inked the paper. I added a few flowers from my stash and there you go! Thanks for looking and leave some feedback! I love to hear what you think.


Hugs,


Stephanie


Thursday, July 29, 2010

My First Vinyl Project


Hi everyone! This is my first vinyl project. I am so excited about it. I made these for my Dad for his big rig. He wanted his nickname and his dog's name to go on the doors of the truck. I used Make The Cut software to cut them. The font is script MT bold. Wishful Thinkin was cut at 1 inch high by 10 inches long. Oreo is 1 inch high by a hair shy of 4 inches long. I was surprised at how thin the vinyl was once I started to pull the negative side off. I actually had to cut Wishful Thinkin twice because I wasn't very careful and pulled off one of the quotation marks. I had already balled up the negative part and it was still attached so I couldn't save it. My dad was thrilled to get them! He actually wants me to redo all of the lettering on his truck. I am looking forward to doing it!! Hope you have a great day!!


Hugs,


Stephanie

Tuesday, July 27, 2010

Beautiful Layout


Hi everyone! Boy, I am on a roll this week! I have another layout for you. These are pictures of my youngest daughter. This would have to be my favorite layout. I just love these pictures too! I used a sketch from Scrapbook Sketches from Scrapiopath. I used Make The Cut for all of the cuts on the page. Paper is from DCWV - Flower Shower Spring Stack. I cut a scalloped circle at about 11 inches. The green frame came from myscrapchick.com. It is the 2 piece doodle frame. I just used the top frame. I enlarged the frame to 5 inches wide by 8.25 inches tall. The pictures in the frame are cut at 4 x 4". I used Make The Cut to cut the word beautiful. It is 1.5" x 4". I also stickled the title as well. The heart above the i is a sequin from my stash. The flowers are cut using yellow card stock. I used the Tags, Bags, Boxes and More cartridge and cut them at 2 inches. I have a stash of buttons that I added blue buttons to the centers. The journaling is Tangerine font and just printed off the printer. That about covers it.

Monday, July 26, 2010

Football/Cheer Layout


Hi everyone! Here is another layout for the LID challenge over at Cricut.com on the messageboard. I chose pictures from 2008 football/cheerleading season. They are pictures of my two children and my two nephews who played that year. I started with paper from Colorbok - School Life. It is the football field paper. I first cut a megaphone from maroon Bazzill card paper. I cut it out a 6". The cutfile is from the MTC gallery. Next, I cut GO LIONS from white cardstock using MTC. Century Schoolbook font was used. The word "GO" was cut at 1/2" and the "LIONS" was cut at 1". I then used the Desgin Studio to cut the tags for under the photos. I used Tags, Bags, Boxes and More cartridge. I pushed the shift button, mirror/window button and lgcrc2-h button to cut out the tags. They were sized in DS at about 3 1/2" long and 3/4" tall when folded down. I then cut out a grey rectangle to fit under the window. I glued the grey cardstock to the tag and glued the window down to form the tag. I added some handwriting and attached them under the pictures with some black brads I had laying around from a long time ago. The football ribbon was also in my stash. Above the journaling, I used footballs cut out from the football svg file from treasureboxdesigns. It was cut at about 1" long. I then cut white and silver ribbon at 3" in length and tied them together. I just attached them to the top and bottom of the journaling. The journaling was done on my computer. For the title, I used Earwig Factory. I think this is a really fun font to play with. The rest of the journaling was done in Tinker Toy. I inked the edges too. That about sums it up. Thanks for checking out my blog and have a great day!!!


Hugs,


Stephanie

Beach Layout


****I can't figure how to get the 2 page layouts to show up without chopping half of it off so if you click on the image, it will show you a close up. *****


Yesterday, I finished a 2 page layout from the Cricut Messageboard for this weeks LID Challenge. I used Tropical Treasures svg file from myscrapchick to cut the sun, the beach balls, the waves and the shovel and pail. For the sun, I cut it at about 4" - I think. I chalked the edges and faux stitched it with a black pen. For the center of the sun, I ran it through my printer using Tangerine font and then popped it. The beach balls were cut at about 1" and just glued together. I duplicated the wave and welded them together to get a line of them. I cut them at about 3" and then chalked them with white chalk. I tore a border of tan paper to represent the sand. I also chalked it with a little bit of brown. I'm not sure the size of the shovel and pail but it was cut and popped too. The journaling (which I am not to fond of) was just printed in Word using Curlz MT font. I cut the lines apart, inked with blue ink and staggered them some. The paper is from Happy Trails Beach Toss. Thanks for looking and would like to hear what you think!!


Hugs,


Stephanie

Sunday, July 25, 2010

Help Help Help

Hi again! I am struggling with posting pictures on my blog. I want to post bigger pictures so the detail can be seen better. I have tried using photobucket and resizing my pictures. It makes them bigger but when I bring them into my blog it cuts half of the picture off. Can anyone help me out here? I am new to all the blogging and not sure what all I can and can't do. Thanks for any help that anyone can give me!!! I so much appreciate it. What does everyone else do with their blogs? How do you import pics and what programs if any do you use?

Aquarium Layout


Hi everyone! Hope you are staying cool this weekend! We were out in the 100 and some degree weather yesterday. My oldest daughter had softball tournaments Friday and yesterday. They won their game Friday and then lost two games yesterday. I think the heat worked a toll on them. It was fun needless to say. Today, I have a two page layout I did from when we went to the aquarium last summer. I love the fish paper from Cosmo Cricket called Snorkel: School's out. The purple mats for the photos came from DCWV Flower Shower Spring Stack. The rest of the paper was scraps laying around that I wanted to use up. I used the Sea Treasures svg file from myscrapchick for the fish, the seaweed, starfish and the snorkel boy. I chalked the edges of the cuts. The water was cut from card stock using the Creative Memories wavy cutting system. It was the first time I had used it. I had a hard time for some reason. It didn't want to cut all the way through the paper. It probably was just me though. Anyways, hope you enjoyed it as much as I enjoyed putting it together. Enjoy the rest of the weekend and stay cool! :)


Hugs,


Stephanie

Sunday, July 18, 2010

Frosty Fun!


Hi again! I have been on a roll this weekend. I created this 2 page layout today and wanted to share! The snowman and the title is from the snowman collection at myscrapchick.com. I just love their paper piecings! You can't see it well, but I did stickle the snowballs and the fun in the title. Stickles is becoming my most favorite piece of scrapbooking must haves! I used paper that I had bought in a paper stack years ago at Wallie World. This was the first time that I have used it. It was so much fun to put together! I'd love to hear what ya think! Does anyone know how to get my pictures to post bigger? You can't see much detail and I'd like to be able to show the detail more.


Hugs,


Stephanie

Finished with the Wedding Album! :)


Hi everyone! If you have been following my blog, I have been working on an album from when my daughter was in a wedding. I finally finished it yesterday!! I am so excited and love how it all turned out! The two page layout is a LID challenge this week over on the Cricut Messageboard. This was my first time participating. I used Make the Cut and the wedding cart for the titles and all of the wedding themed embellishments. You can't see to well, but I stickled the cake and the wedding bells. Thanks for looking and I'd love to hear your feedback on my work and my blog!
Hugs,
Stephanie